Making our development environment ready for contributions to cheminfo
Most, if not all, contributors to the cheminfo ecoystem use the VSCode editor with some plugins. We also follow a few conventions with respect to commit messages and directory structure. We also discuss some points in the starting guide GitHub. This post is thought as a guide for new contributors to the cheminfo projects.
VSCode setup
If you did not install VSCode we recommend you install it. It is available on all major operating systems and comes with incredible support for Git, remote connections, and plugins for all kinds of languages.
Plugins
We like to use the following plugins:
prettier: To automatically format your code nicely. It is useful to configure to do this automatically upon saving.
jest: To test your code using Facebook's jest
ESLint: This will underline lint errors in the code and suggest quick fixes. This blog post by Digital Ocean gives some more information on how one can use ESlint with VSCode
Markdown All in One: For powerful markdown preview and keyboard shortcuts.
Document this: To insert JSDoc docstrings.
GitHub Pull Requests and Issues: To review pull requests from VS Code and show issues, you can directly "start working on an issue" and make a new branch.
It is also really useful to browse in the store as there are plugins for any possible application, i.e., to color columns in csv files, highlight syntax in CIFs, or to launch a live development server. If you want to try incredible, deep learning powered, autocomplete you can give the tabnine plugin a shot. For editing key/value pairs of any kind the Toggle Column Selection can be useful.
To install a plugin you can just click on the extensions symbol (building blocks on the left menu bar) and then search for the extension you want and click on "install".
Shortcuts and key bindings
There are a couple VSCode shortcuts that are handy to know. In the VSCode documentation you can find an overview of key bindings.
⌘+P: Is the main keybinding in VSCode. It will open menu which you can use to go to files. If you type>you can run command (like opening a newsshconnection)⌘+SHIFT ⇧+F: With this shortcut you can search through all files in a directory at once. The results will show up on the left, and you can use the arrow to open a search/replace box.⌘+\: If you highlight some code/text this will comment/uncomment it.- Option+UP/DOWN`: Moves the selected line up/down
⌘+KZ: Toggles Zen mode
GitHub integration
Most of the things you might want to do on GitHub can be done from VSCode. If you are new to Git and GitHub there are a lot of excellent resources that explain the basics. A good introduction for scientist gives the Turing way book.
Branch, commit, pull requests
The Source Control icon in the Activity Bar (CTRL+SHIFT ⇧+G) the left will list the uncommitted changes in your workspace, you can enter a commit message and use the checkmark to commit the changes.
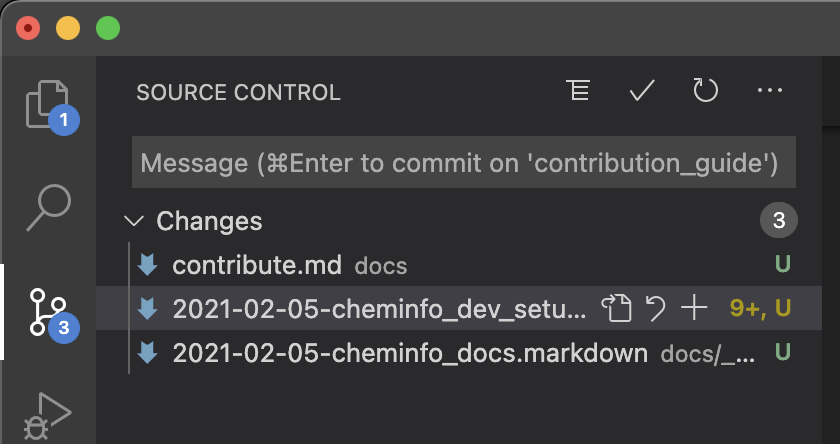
In the footer you'll see an indication on which branch you are working on (and you can switch branches by clicking on it) and an icon that allows you to push the changes.

Pull requests and issues
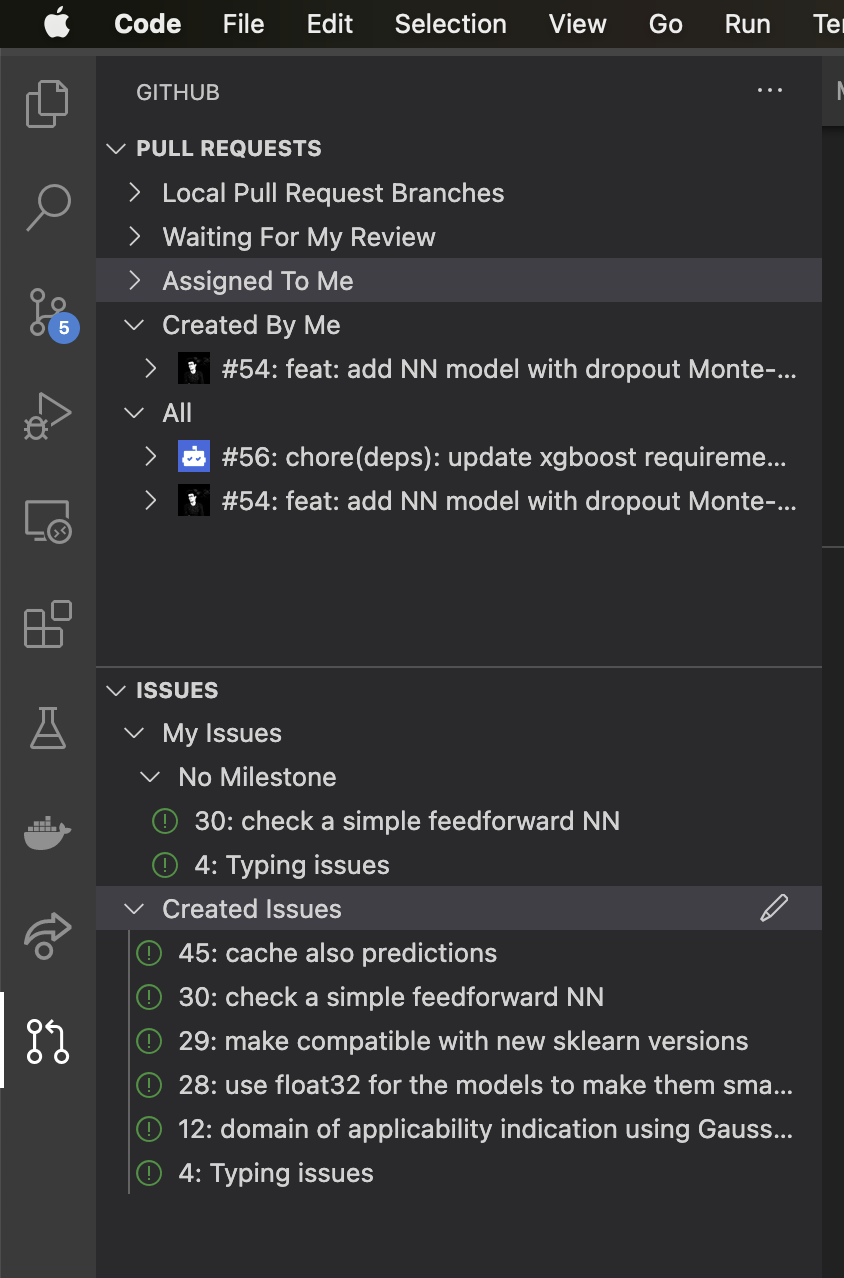
The GitHub Pull Requests and Issues extension allows browsing issues and pull requests. In the screenshot below we see that there are two pull requests in this particular repository one of which has been created by me and another one which has been created by dependabot. We can also see a list of all issues and directly create a new branch that is linked to a particular issue by clicking on the arrow that appears when we hover over the list.
Other tools
- Node.js: You should install the Node.js JavaScript runtime. One the website you will find downloads for all major operating systems
- yeoman generator:
npm install -g yoto bootstrap new projects - ncu:
npm install -g npm-check-updatesto update dependencies. It is useful to regularly runncu -uto keep the dependencies updated - the cheminfo generator
npm i -g yo generator-cheminfoas generator for the different cheminfo organizations
Project structure
In general we like to organize or projects in a directory structure as ~/git/organization/project. This is, we would work on the documentation repository in ~/git/cheminfo/c6h6-documentation. We found that this makes it easier to collaborate.
Creating a new project
To bootstrap new projects, we use a yeoman generator. For using this, you will need to first install the cheminfo generator. Then you can mkdir your project directory, cd into it and run yo cheminfo:module. This will ask you some questions and create most of the boilerplate (like the package.json, some README template, eslint rules, babel settings ...) for you.
File organization
We typically like to have small files with pure functions (where it makes sense).
In every subfolder we will make a __test__ directory in which we will have a module.test.js file for everymodule.js. That is, a project might look like
├── package.json
├── src
│   ├── from
│   │   ├── __tests__
│   │   │   ├── fromJcamp.ntuples.test.js
│   │   │   ├── fromJcamp.test.js
│   │   │   ├── fromPerkinElmer.test.js
│   │   │   ├── fromPerkinElmerCSV.test.js
│   │   │   ├── fromTAInstrumentExcel.test.js
│   │   │   ├── fromTAInstruments.test.js
│   │   │   └── parseTAInstrumentExcel.test.js
│   │   ├── fromPerkinElmer.js
│   │   ├── fromPerkinElmerCSV.js
│   │   ├── fromTAInstruments.js
│   │   ├── fromTAInstrumentsExcel.js
│   │   ├── parsePerkinElmer.js
│   │   ├── parseTAInstruments.js
│   │   └── parseTAInstrumentsExcel.js
│   └── index.js
Code style
We generally use the ES6 specification and follow the typical coding conventions:
- variable names are
camelCase - global variables are
UPPERCASE - node packages use
-in their name and not_
You should use let and const instead of var
Google wrote a useful styleguide. Note that if you use prettier the formatting will be done automatically for you and ESlint (if you use the cheminfo generator) will let you know about variable naming and other issues that can be found via static code analysis.
Some other useful points are
- That typed arrays can be useful as they can increase performance and reduce the likelihood of mistakes
- We try to use the same packages in different projects. We collect the most relevant ones in the awesome cheminfo list
- If you pass keyword arguments to a function, we usually use destructuring on a
optionsobject an example is
function xPadding(array, options = {}) {
  const { size = 0, value = 0, algorithm = '' } = options;
Code documentation
We document the API using jsdoc. In addition to that we try to at least provide a meaningful snippet in the README.
Test driven development
It can be practical to use the "watch mode" of jest. This will continuously run the test suite in the background npx jest --watch. If you just want to run the test suite once, you can use npm run test.
In practice, it can often be useful to write, in the spirit of test driven development, tests before the actual implementation. This can also help to shape the API in an useable form.
Commit messages
To automate the generation of the changelog and the releases, we use conventional commits. The basic structure is
<type>[optional scope]: <description>

[optional body]

[optional footer]
where the most important types are
fix: for patches, i.e., aPATCHbump in semantic versioningfeat: for new features, i.e., aMINORbump in semantic versioningchore: for changes that an external user would not notice (updating.gitignore, private methods, ...)
If there is a breaking change (MAJOR bump in semantic versioning) the commit message might look like
feat: add parseAbcXY

BREAKING CHANGE:

Renamed parseXY to parseAbcXY
We recommend that you use imperative mood in the subject line of your commit message. Ideally, your subject line is the completion of "If applied, this commit will your subject line here"
GitHub actions
In most of our projects we use several GitHub actions that build the documentation, make the release and run the tests.
- Release Node.js package: Uses release please to release the package on npm.
- Node.js CI
- Deploy on lactame.com
- Deploy documentation.js on GitHub pages
If you create a new project in the cheminfo organization you can use the actions tab to add the actions to your repository. It can be useful to make a commit with release-as: v0.1.0 as commit message to avoid that release-please starts with v1 after an initial feat commit.
Developing code for the visualizer
Many of the frontends (e.g, c6h6.org) are developed using the visualizer library. There is unfortunately not a complete documentation for this project but a few useful resources:
- The tutorial tab on cheminfo has some basic tutorial on how the visualizer can be used
- You can use
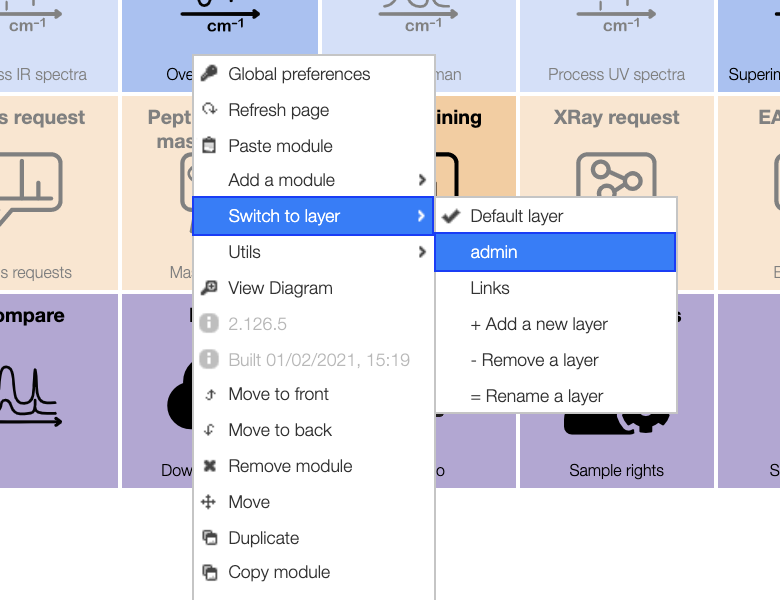
⌘+Mto create new modules - It is usually practical to use multiple layers to keep the code organized, e.g., one Admin layer for every major computational operation. You can edit the layers using a right click and the options under the
Switch layermenu